
|
||
| Network Testing and Emulation Solutions |
|
|
||
| Network Testing and Emulation Solutions |
The LANforge Hardware installation documentation covers installing rack-mount chassis designed to fit into a 19-inch frame. This documentation also covers adding an additional ethernet card to an existing chassis. This document assumes that you have obtained your hardware from Candela Technologies or a licensed distributor of LANforge equipment. If you are running LANforge on your own hardware, then most of this document will not directly apply to you, though it may still offer you some useful information.
In addition to the contents of your package, there are other hardware requirements you need to satisfy before you can configure the LANforge equipment for the first time.
These requirements include:
Once configured for the local management network, all items except the ethernet cable are no longer required for the traffic modules. The monitor, keyboard and mouse are not mandatory for the host modules but are recommended to ease usability of the system.
The traffic modules are 19' rack mountable modules. The modules can be mounted vertically within the same rack with minimal air gap. The traffic modules need not necessarily be co-located to work together: As long as the same management network is used to connect all the traffic and host modules, the devices can be remote.
Unless you are upgrading a Data Generator in the field, you will not need to install any Ethernet Port Cards, as they come pre-installed. However, for upgrades, here is the general procedure. Candela Technologies will work with you to understand your environment and give more detailed instructions if needed.
After all of the modules are located, the management network of the LANforge system needs to be installed. Candela Technologies suggests that you configure a separate management local area network (LAN) for the LANforge system. The network might look something like this:
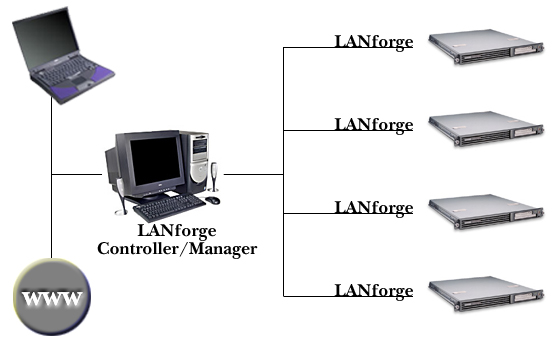
Each module, traffic or controller, contains a management port, which should be labeled as such. Connect all management ports to a network that will be independent of the testing network. This may typically be a site management network of some sort or an exclusive network for the LANforge management traffic. It can be as simple as a 10/100bt ethernet hub or switch.
NOTE: Due to the discovery process that the LANforge Controller uses, you should never have more than one controller on the same management network unless the Controllers are configured for different 'realms' in lfconfig.
NOTE: If you supply Candela Technologies with this information at purchase time, your equipment will come pre-configured, so that all you have to do is power up the systems!
NOTE: ONLY change the management port (probably eth0), the LANforge GUI can be used to change the data-generating ports.
This section describes the configuration needed to begin use of the LANforge system. Before starting, the network administrator should decide on a unique IP address, a subnet mask, a default gateway, a host name and the domain for each module (traffic and host).
To change the IP information, you should use the appropriate tool for your particular operating system. For Fedora Core Linux, try: system-config-network
You may want to reboot the machine to ensure that it
comes up correctly before you remove the keyboard/mouse/monitor. To reboot, type:
reboot
The monitor, keyboard and mouse are optional now for this module. Note: it is recommended that the monitor, keyboard and mouse be maintained on the host modules for ease of use. Repeat this procedure for all the modules that need configuration.
This section attempts to help resolve some of the more common problems that users experience. If, after reviewing this section carefully, the problem is still present, please contact Candela Technologies technical support at support@candelatech.com.
Some systems have very small power buttons on front. Make sure you've pressed the right one!
