Candela Technologies Logo
Network Testing and Emulation Solutions

LANforge Client Installation

Overview

  1. Choosing a Machine
  2. Download LANforge Software
  3. Installing LANforge Client on Linux
  4. Installing LANforge Client on Microsoft Windows
  5. Installing LANforge Client on Mac OS X
  6. Installing on Other Java-Enabled Platforms
  7. Upgrading LANforge Client on Linux
  8. Upgrading LANforge Client on Microsoft Windows
  9. Fixing Windows HiDPI Scaling
  10. Building LANforge Client on Linux
  11. Troubleshooting Guide

Overview

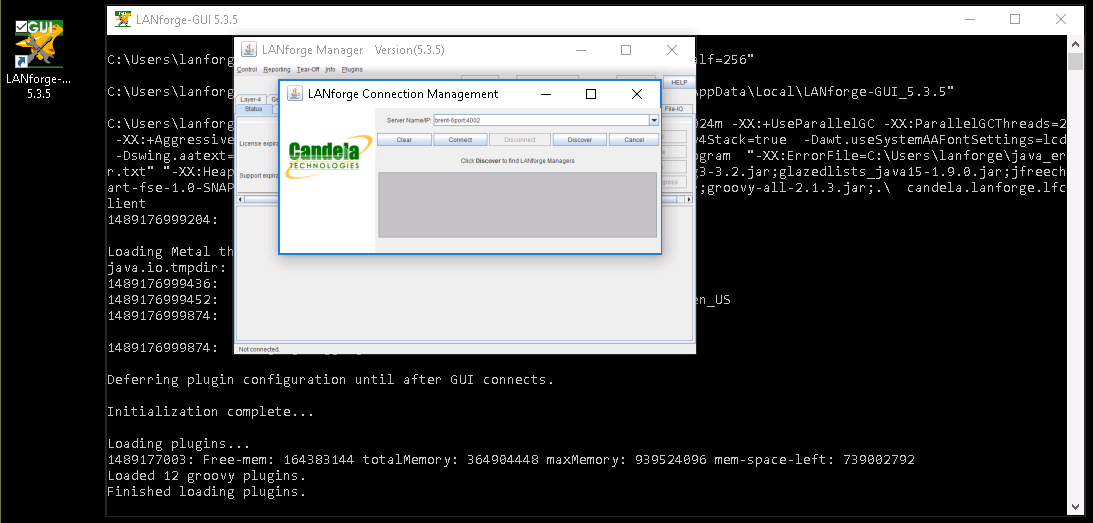
The LANforge Client is the graphical interface to the LANforge server. It can also operate as a headless client for purposes of being a JSON gateway to the LANforge Server. The Client is written in Java and should work on any platform that supports Java, including Windows, MAC and Linux. We have specific instructions and support for Windows, MAC and Linux. A general section at the end of this document will describe installations on other platforms.

  1. Choosing a Machine

    The suggested minimum client platform specification is:

    • 1 Ghz processor
    • 512 MB RAM
    • 200MB Free Disk Space
    • Monitor/Video Card capable of 1024 x 960 resolution or higher.

    For optimal performance, we recommend at least:

    • 2 Ghz+ processor
    • 1 GB RAM
    • 500MB Free Disk Space
    • Monitor/Video Card capable of 1200 x 1064 resolution or higher.
  2. Download LANforge Software

    Navigate your web browser to the Candela Technologies Downloads page.

    Select the LANforge product you wish to install and save it to your /home/lanforge directory (Linux) or desktop (Windows). You may need to edit your web browser preferences to save downloads to this location.

  3. Installing LANforge Client on Linux

    The LANforge Client has been extensively tested on Fedora Linux. However, it should work on any version of Linux that supports a recent Java Runtime Environment (JRE).

    • Choose a user to own the LANforge Client. Any non-root user should work, but for this document it is assumed that your user is called 'lanforge.' If you need to create a new user (on Fedora, for example) you can use these commands (as root):
      # adduser lanforge
      # passwd lanforge
      (Choose a password for the lanforge user)
    • Log in as user lanforge:
      # su - lanforge
    • Choose a directory in which to install the LANforge Client. We suggest $HOME/lanforge. If this directory does not yet exist, you can add it with this command (as user lanforge):
      $ mkdir $HOME/lanforge
    • Download the LANforge Client package to the newly created $HOME/lanforge directory. See Download LANforge Software above.
      NOTE: For CD installation, use this procedure as root:
      # mount /mnt/cdrom (This step may not be necessary)
      # cp /mnt/cdrom/LANforgeGUI_*_Linux.tar.bz2 $HOME/lanforge
    • Extract the LANforge Client package as lanforge. For example:
      $ cd $HOME/lanforge
      $ tar -xvjf LANforgeGUI_*_Linux.tar.bz2
      (Uncompresses the distribution)
    • For release 5.0.9 and onwards, install the LANforge Client Desktop icons as the root user.
      For example:
      # su -
      # cd $HOME/lanforge/LANforgeGUI_X.X.X (Where X.X.X is the release number of the Client)
      # ./lfgui_install.bash
    • Start the LANforge Client as lanforge with the commands:
      $ cd $HOME/lanforge/LANforgeGUI_X.X.X
      $ ./lfclient.bash
      (Starts the Client)
    • Click through End User License Agreements for LANforge-Server and LANforge Client by clicking 'OK'.
    • Optional configurations:
      NOTE: As of release 5.1.2, these options can be configured from within the LANforge Client in the 'Control->Preferences' pulldown. menu.
      The LANforge Client supports several command-line options that will help you customize its look-and-feel to your particular needs. These options can be added to the lfclient.bash script, or passed to the lfclient.bash script when invoking it (Ex: ./lfclient.bash -simpleice). The options are:

      -nofire
      Hides Traffic Generation (FIRE) related screens. This option is good for LANforge-ICE (only) installations.

      -noice
      Hides WanLink (ICE) related screens. This is good for LANforge-FIRE (only) installations.

      -nocd
      Hides WanLink (ICE) Collision-Domains.

      -simpleice
      Displays only WanLink (ICE) related screens (similar to -nofire)

      -nofe
      Hides File Traffic Generation (FIRE) related screens.

      -novlc
      Hides streaming media related screens.

      -nol4
      Hides Layer 4-7 (FTP, HTTP, VoIP) Traffic Generation (FIRE) related screens.

      -nogen
      Hides Generic Traffic Generation (FIRE) related screens.

      -noarm
      Hides Armageddon related screens.

      -nospans
      Hides T1 Serial Spans (FIRE) related screens.

      -noppp
      Hides PPP-Links (FIRE) related screens.

      -nocli
      Hides the Messages tab.

      -notm
      Hides the Test Manager tab.

      -nocomma
      Commas in groups of displayed numbers will not be displayed.

    The LANforge Client should pop up shortly after this if everything worked correctly!

  4. Installing LANforge Client on Microsoft Windows

    The LANforge Client has been tested on XP, Vista and Windows 7. It should also work on most other Windows versions.

    • Download the LANforge Client installer to your desktop. See Download LANforge Software above.
    • Execute the LANforge Client installer
      This will create desktop and run-menu shortcuts and provide the ability to configure the features displayed by the Client.
    • Start the LANforge Client by double-clicking the LANforge Client (anvil) desktop icon.
      NOTE: Windows Vista users must run the LANforge Client as administrator to function properly. The shortcut properties should be modified to run as administrator: right-click on the shortcut icon, select Properties and click the Advanced button. Select 'Run as administrator' then click OK on both the Advanced Properties and LANforge Client Properties windows. After double-clicking the LANforge Client (anvil) desktop icon, click 'Continue' in the User Account Control popup.
    • Click through End User License Agreements for LANforge-Server and LANforge Client by clicking 'OK'.
    • Optional Package: cygwin X-windows
      If you are managing Linux data generators with a Windows Client, you must have an X-windows server installed on your system in order for the 'Sniff Packets' option on the Port Mgr tab to work. Cygwin X-windows is a free implementation that has been tested with LANforge and Wireshark.

      NOTE: Cygwin versions after 1.17 require using the -listen tcp option.

      See a detailed example here: Display Wireshark Using Cygwin

      Read the install instructions for cygwin. When configuring which packages to install, choose the xorg-x11-base package (at a minimum). When done installing, double-click the Cygwin icon that was created on your desktop.

      In the console that pops up, type:

      • Cygwin versions before 1.17 startx
      • Cygwin versions after 1.17 startxwin -- -listen tcp

      To allow all X11 connections: xhost +. You can allow only some addresses to connect. We'll use 192.168.1.101 as the example IP address of the LANforge system.

      NOTE: The xhost + command allows any system to connect to yours with the X-windows protocol. To let only the LANforge system connect: xhost 192.168.1.101
      Then click the Sniff Packets button on the Port Mgr tab of the LANforge Client. The DISPLAY variable should be 192.168.1.101:0.0 (It should default to the right value in most cases.) If all is working, the Wireshark packet sniffer should pop up within a few seconds.
  5. Installing LANforge Client on Mac OS X

    We provide a DMG and a TAR archive of the LANforge client. We expect most installations will be done using the DMG file.

    1. Double click the .dmz.xz file to decompress it.
    2. You will see the uncompressed .dmz file in your Downloads folder presently.
    3. You may delete the .dmz.xy
    4. Double click the .dmg installer.
    5. A window with the LANforge GUI icon will appear.
    6. Drag the LANforge GUI icon do your Applications folder.
    7. Use Apple-E to eject the DMG folder window.
    8. You may delete the .dmz file

    We do not bundle a JRE with the DMG or the TAR archive because Apple will de-activate old Java installs on Mac OS, hoping you will use recent and secure Java releases.

    You can download Java from the Oracle website. After you install it, you will want to follow these instructions to set the JAVA_HOME environment variable for your terminal:

    1. Open Terminal
    2. Edit your .bash_profile to include your .bashrc file: vim .bash_profile :
      source .bashrc
    3. Edit your .bashrc to export the JAVA_HOME environment variable: vim .bashrc:
      export JAVA_HOME=$(/usr/libexec/java_home)
    4. Save the files and close the terminal.
    5. Verify the settings by opening a new terminal and typing: echo $JAVA_HOME
      You should see something like:
      /Library/Java/JavaVirtualMachines/1.8.144.jdk/Contents/Home

    These techniques are discussed more on Stack Overflow and Mkyong.com.

  6. Installing on Other Java-Enabled Platforms

    Generally, you will need to obtain a Java run-time environment (JRE), version 1.6 (aka Java 6) or greater (Older versions might work but are not officially supported.)

    • Download the 'NO JRE' LANforge Client distribution to the $HOME/lanforge directory. See Download LANforge Software above.
      NOTE: For CD installation, use this procedure as root:
      sudo mount /mnt/cdrom (This step may not be necessary)
      sudo cp /mnt/cdrom/LANforgeGUI_*_NO_JRE.zip $HOME/lanforge
    • Unzip the LANforge Client as user lanforge:
      cd $HOME/lanforge unzip LANforgeGUI_*_NO_JRE.zip
    • Set (or unset) your environment variable (like CLASSPATH, etc.,) as per the JRE installation instructions, and add all of the *.jar files from the LANforgeGUI directory to your CLASSPATH.
      For example:
      CLASSPATH="./lfclient.jar:./gnujaxp.jar:./jfreechart-1.0.13-experimental.jar:./junit.jar"
      CLASSPATH="$CLASSPATH:./iText-2.1.5.jar:./jfreechart-1.0.13.jar:./jcommon-1.0.16.jar"
      CLASSPATH="$CLASSPATH:./jfreechart-1.0.13-swt.jar:./swtgraphics2d.jar:./"
      export CLASSPATH
    • Start the LANforge Client with a command similar to:
      java -cp $CLASSPATH candela.lanforge.lfclient
  7. Upgrading LANforge Client on Linux

    To upgrade your LANforge Client from an existing Linux installation, follow these instructions:

    • Download the new LANforge Client package to the $HOME/lanforge directory. See Download LANforge Software above.
      NOTE: For CD installation, use this procedure as root:
      sudo mount /mnt/cdrom (This step may not be necessary)
      sudo cp /mnt/cdrom/LANforgeGUI_*_Linux.tar.bz2 $HOME/lanforge
    • Remove the previous installation as user lanforge:
      cd $HOME/lanforge
      rm -rf LANforgeGUI_X.X.X
      (Where X.X.X is the release number of the version you are removing)
    • Remove the symbolic link: (if upgrading from a release prior to 5.0.9)
      rm -rf LANforgeGUI
    • Remove Desktop Icons: (if upgrading from a release prior to 5.0.9)
      $ rm -rf Desktop/LANforge*.desktop
    • Extract the LANforge Client package as lanforge. For example:
      cd $HOME/lanforge
      tar -xvjf LANforgeGUI_X.X.X_Linux.tar.bz2 (Uncompresses the distribution)
    • Install the LANforge Client Desktop icons as root (release 5.0.9 and later). For example:
      sudo cd $HOME/lanforge/LANforgeGUI_X.X.X
      (Where X.X.X is the release number of the Client)
      sudo ./lfgui_install.bash
    • Start the new LANforge Client:
      cd $HOME/lanforge/LANforgeGUI_X.X.X
      ./lfclient.bash (Starts the Client)
    • Click through End User License Agreements for LANforge-Server and LANforge Client by clicking 'OK'.
  8. Upgrading LANforge Client on Microsoft Windows

    To upgrade your LANforge Client from an existing Windows installation, follow these instructions:

    • Download the new LANforge Client installer to your desktop. See Download LANforge Software above.
    • Uninstall the previous LANforge Client:

      • From the Start menu, select Control Panel and Add or Remove Programs (Vista: click the Uninstall a program link).
      • Select the current version of the LANforge Client then click the Remove button (Vista: click the Uninstall/Change button on the top panel then click Continue in the pop-up window).
    • Install the new LANforge Client:
      • Double-click the LANforge-GUI-X.X.X-Installer shortcut on your desktop (where X.X.X is the release number of the version you are installing). NOTE: Windows Vista users must select Allow in the User Account Control popup.
      • Click I Agree to the GNU General Public License, click through the setup options, and click Install.
      • Select your desired configuration: LANforge-FIRE, LANforge-ICE, or Both, then click through to OK
    • Start the LANforge Client by double-clicking the LANforge Client (anvil) desktop icon.
      NOTE: Windows Vista users must run the LANforge Client as administrator to function properly.
      The shortcut properties can be modified to run as Administrator:
      1. right-click on the shortcut icon, select Properties and click the Advanced button.
      2. Select Run as administrator then click OK on both the Advanced Properties and LANforge Client Properties windows.
      3. After double-clicking the LANforge Client (anvil) desktop icon, click Continue in the User Account Control popup.
    • Click through End User License Agreements for LANforge-Server and LANforge Client by clicking 'OK'.
  9. Fixing Windows HiDPI Scaling

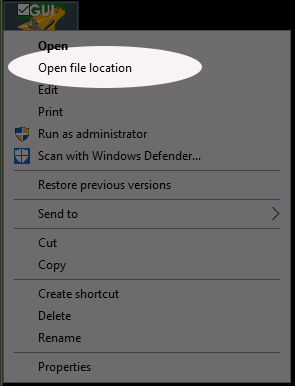
    Windows 8.1–10 introduce display scaling for high-DPI screens that can squeeze your Java window into the size of a postage stamp on machines the the Surface Pro. Follow these steps to disable that feature for the LANforge Client. Close the LANforge Client if you see this happen:

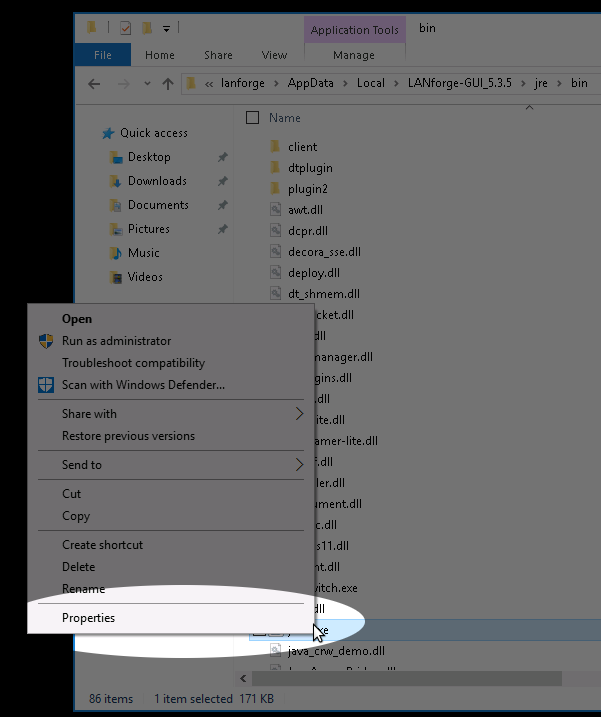
    1. Right-click on your LANforge Client desktop icon and click Open file location

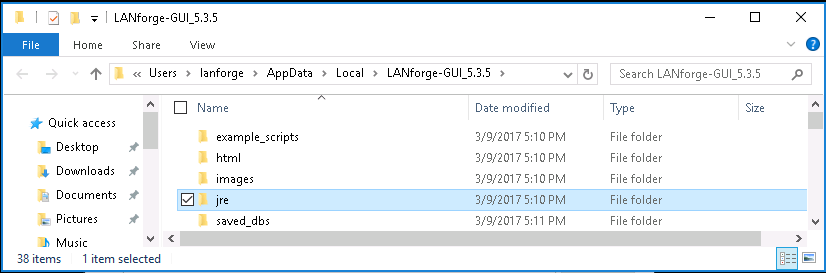
    2. You are going to navigate into the jre/bin directory and look for the java.exe program.
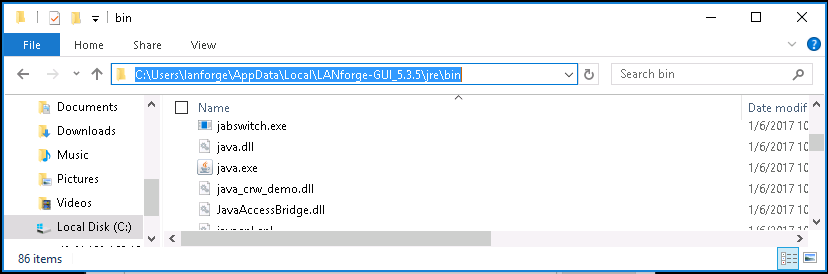

    3. Click on Properties

    4. Check Disabled display scaling on high DPI settings

    5. Click OK and close the Explorer windows.
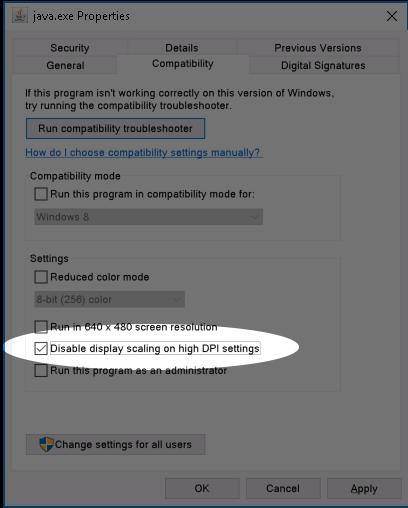
    6. You can now re-start the LANforge Client using the desktop icon. The text in the title-bar will be strangely large, but the text inside the Java application should appear normal.

    Other HiDPI References

    There is another method of doing this using the Windows Run Programs troubleshooter. This takes about 25 steps to do about the same thing.

    There is a java.exe option -Dsun.java2d.dpiaware=false that works with some combinations of windows 7, 8 and versions of Java. This technique is supposed to disable the Swing library's DPI detection and let Windows do the job. This does not appear to work in Windows 10.

  10. Building the LANforge Client on Linux

    You can build and customize the LANforge Client by downloading and the source code and building it on your workstation. (See the Optional Packages section of the Downloads page.). This example will start with downloading the lfgui-src-5.3.9.tar.gz file to your ~/Downloads folder, and building in /var/tmp.

    These instructions apply to releases 5.3.6 and newer.

    1. Create a ~/build directory:
      $ mkdir ~/build
    2. Expand the archive and run the environment setup script gui_build_env.sh. That script will download any necessary packages and make symlinks as necessary. Feel free to edit that script, dependency packages can change over time. The build is going to want you
      $ cd /var/tmp
              $ tar xf ~/Downloads/lfgui-src-5.3.9.tar.gz
              ...
              $ cd LANforgeGUI_5.3.9_src
              $ ./gui_build_env.sh
            
      Reading package lists... Done
      Building dependency tree
      Reading state information... Done
      ant is already the newest version (1.9.6-1ubuntu1).
      groovy is already the newest version (2.0.0~beta2+isreally1.8.6-4ubuntu1).
      lbzip2 is already the newest version (2.5-1).
      libcommons-lang3-java is already the newest version (3.4-1).
      libmiglayout-java is already the newest version (4.2-1).
      maven is already the newest version (3.3.9-3).
      maven-ant-helper is already the newest version (7.11).
      git is already the newest version (1:2.7.4-0ubuntu1.2).
      openjdk-8-jdk is already the newest version (8u131-b11-2ubuntu1.16.04.3).
      wget is already the newest version (1.17.1-1ubuntu1.2).
      0 upgraded, 0 newly installed, 0 to remove and 0 not upgraded.
      ln: failed to create symbolic link '/home/jreynolds/build/jar/commons-lang3.jar': File exists
      ln: failed to create symbolic link '/home/jreynolds/build/jar/miglayout-core.jar': File exists
      ln: failed to create symbolic link '/home/jreynolds/build/jar/miglayout-swing.jar': File exists
      # ----- ----- ----- ----- ----- ----- ----- ----- ----- ----- ----- #
      #  Your environment is configured to run a LANforge Client build.
      #  Your build will not be identical to the Candela linux-64 Client
      #  but it will be basically similar.
      #  To continue, run:
      #     cd client; make distrib_3pdev
      # ----- ----- ----- ----- ----- ----- ----- ----- ----- ----- ----- #
    3. Continue into the client subdirectory and run the build command:
      $ cd client
      $ make distrib_3pdev
      There will be a lot of output, and a successful build will end with a tar command:
       ...lots of output...
      tar -I lbzip2 -cf /home/lanforge/public_html/lanforge/downloads/LANforgeGUI_5.3.9_Linux64_3pdev.tbz2 LANforgeGUI_5.3.9
    4. The result will be in ~/public_html/lanforge/downloads/LANforgeGUI_5.3.9_Linux64_3pdev.tbz2.
    5. You can install the Client by extracting the archive and using the lfclient.bash script inside:
      $ tar xf LANforgeGUI_5.3.9_Linux64_3pdev.tbz2
      $ cd LANforgeGUI_5.3.9
      $ ./lfclient.bash
    6. To clean the build environment:
      • $ rm -rf ~/build/*
      • $ rm -f ~/public_html/lanforge/downloads/*
      • $ cd ~/LANforgeGUI_5.3.9_src/client; make clean
  11. Troubleshooting Guide

    Q. I'm using Windows Vista and LANforge Client won't launch from the desktop icon.
    A. Windows Vista users must run the LANforge Client as administrator to function properly. The shortcut properties should be modified to run as administrator: right-click on the shortcut icon, select Properties and click the Advanced button. Select 'Run as administrator' then click OK on both the Advanced Properties and LANforge Client Properties windows.
    Q. I double click the icon and nothing happens
    There is probably a problem with the path to your Java environment. Please follow the Diagnose Problems with GUI cookbook to see errors produced by the lfclient.bat script.
    Q. My client is disconnecting
    You might be experiencing a driver error on your LANforge machine. Please review the Trouble-Shootiung and Debugging LANforge guide for advice on how to collect data diagnostic data.

Email Candela Technologies at: support@candelatech.com if you have any questions.


Candela  Technologies, 2417 Main Street, Suite 201, Ferndale, WA 98248, USA
www.candelatech.com | sales@candelatech.com | +1.360.380.1618
Facebook | LinkedIn | Blog